Making rough images (quick scanning tricks)
Some of our rough images come straight from a digital camera. Others started life on film. Here are two techniques we're used to make quick but acceptable digital "scans" from film. Later, we use a high-quality film scanner to make the final scans of images.
(This quick method makes digital versions that are good enough to show what's in the images. Browsing quick digital versions is much faster than leafing through paper prints or putting slides on a light table. It's also easy to magnify these quick scans to show detail that you can't see in a small print.)
For slides
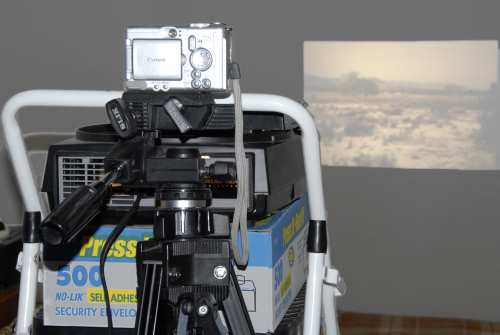
A slide scanner can help, but it's still slow and tedious compared to this method. Once you get this set up, you can "scan" as many as 15 or 20 slides per minute (if your camera is controlled from your computer).
- Load the slides into slide projector trays, all horizontal. (Turn vertical slides 90 degrees.) Or use a stack loader.
- Shine the projector on a matte white wall (so there's no glare) in a completely-dark room. Make the image fairly big: at least three feet (one meter) wide, if you can. (This makes any spots, imperfections, etc. in the wall less noticeable.) Line up the projector so the images on the wall have square edges (not "keystoned", where one edge is longer than the opposite edge). If the projector lens isn't great, the images may have slightly-curved edges; you'll have to live with that. (These aren't supposed to be perfect scans, just "good enough" to see the images.)
-
Set your digital camera on a tripod as close to the projector as possible.
Point the camera at the wall and zoom in to almost fill the camera's
view (but leave some margin around the edges; you'll want it if you need
to correct the image).
Try to zoom your lens in some; avoid the widest-angle settings if you can
(most digital camera lenses make bad barrel distortion when they're zoomed
all the way out).
-
Turn off the camera flash.
The camera will time-expose, which means it needs to be steady!
If the camera has a remote control (for instance,
a cable and software that save photos directly to
your computer's hard disk, bypassing the camera's memory card)
that's best.
Otherwise, you'll need to set the camera on self-timer so it'll
have a few seconds to stop shaking after you click the shutter button.
(If you don't have a remote cable, but you have one of the new "memory cards" that sends photos from the camera directly to a computer via Wi-Fi as soon as you take them, this will save you time if you have hundreds of photos to shoot.) - Consider setting your camera to a high resolution. It's amazing how much detail this method can give, so don't short-change yourself by taking low quality photos. (You can always make smaller copies later in a photo editor.)
- Turn on the projector and give it time to warm up. (Some projectors shoot heated air at the slides to warm them up so that they're less likely to "pop" -- and change their focus -- once they're in front of the heat from the projector bulb.) Turn off the room lights.
- If your camera can focus manually, set the focus now. Setting the focus will avoid wasted time auto-focusing before each shot -- after all, every photo will be exactly the same distance away from the camera!
-
Try several test shots.
Get a sense of how long the projector takes to come into focus for each slide --
or, if you focus manually, whether the slides are generally all in focus
(especially if the slide "pops" into focus after it heats up).
Then turn on the room lights and look at the digital images in your computer:
- If the colors are all too yellowish, try setting your camera's White Balance on "tungsten" (a light bulb icon).
- If there's not some black border on all sides of the image, zoom the camera (or the projector lens) out to make a slightly smaller image. (The projector and/or camera may shift as you shoot the other slides; leaving a border will leave some "slack" for these changes.)
- Look at the images full-screen and also at at 100% size (1:1 magnification). Do they look "good enough" for you to clearly see the photo subject? If they don't, experiment with your setup.
- Turn the lights off and shoot more photos. Once in a while, use the camera's LCD screen to check the images you've been shooting: are they still okay? It may also be helpful to make notes about which slide is in which digital photo file ("the first photo of Aunt Mary's picnic is in photo DSC12345"). (You can probably get the digital filename by using your camera's "info" button near the LCD screen.)
For negatives
If you have a film scanner that automatically feeds each negative and scans it, use that and don't read this section! ;-)
If you have (or can borrow or rent) a flatbed scanner with a film adapter, scan entire strips of film into single images:

Then, you can quickly cut each image to individual frames by setting a fixed-size cropping area in your image editor, them sliding the crop along the strip, copying each frame and pasting it into a new image (in GIMP, the shortcut keys are Ctrl-c, then Alt-e n, then Alt-i f).
If an image looks "good enough," save it; otherwise, you can do the cleanup right now.
Last change (to this page): 9 September 2008